
Signature Dissection - Round 1!
Recently, I was speaking to Forgotten and a couple of others regarding the information and guidance available for truly understanding Snort/Suricata signatures. While documentation and the odd blog post does exist, the more advanced features and lack of context for signatures can become overwhelming rather quickly without guidance. This post aims to dissect Suricata signatures of various difficulties with explanation of how the signature works.
Click to read Forgotten’s Snort post.
Suricata Documentation
Documentation for Suricata is rather plentiful and it is recommended that you study this documentation or have it open for the remainder of this blog post to fully understand the signature dissection in later sections. Basic Suricata rule knowledge is assumed.
Dissection 1: SSL/TLS Certificate Signatures
alert tls $EXTERNAL_NET 443 -> $HOME_NET any (msg:"ET TROJAN ABUSE.CH SSL Fingerprint Blacklist Malicious SSL Certificate Detected (ZeusPanda MITM)"; flow:established,from_server; content:"|55 04 03|"; content:"|10|115f697a1698.bid"; distance:1; within:18; reference:url,sslbl.abuse.ch; classtype:trojan-activity; sid:2024686; rev:2;)
If you have a pcap containing the inbound certificate, you could potentially create the signature on the certificate providing that the signature has unique attributes and is not issued by a provider such as Lets Encrypt. In the case above, the subject common name on the certificate is ‘115f697a1698 . bid’ meaning that we can write a signature based on that. The bytes ’55 04 03’ identify the ‘id-at-commonName’ field so we can narrow down the signature search so that it does not search entire packets for a single domain. The preceding byte |10| on the domain content match specifies the length of the domain in hex. 0x10 in decimal is 16, the length of the domain is 16 bytes.
However, you will not always have the certificate to create such a signature. Another method to detect on this would be to create a signature on the client request for the certificate. A different example signature will be used for this. This example signature is shown below.
alert tls $HOME_NET any -> $EXTERNAL_NET any (msg:"ET TROJAN Observed Malicious Domain SSL Cert in SNI (JS_POWMET)"; flow:established,to_server; content:"|16|"; depth:1; content:"|01|"; distance:4; content:"|00 00 0c|bogerando.ru"; fast_pattern; reference:url,blog.trendmicro.com/trendlabs-security-intelligence/look-js_powmet-completely-fileless-malware; reference:md5,31f83bf81b139bcc69e51df2c76a0bf2; classtype:trojan-activity; sid:2024512; rev:3;)
This type of SSL signature focuses on the Server Name subfield within the Server Name Indication Extension main field in a Client Hello request. There are 3 content matches which do the following.
Identify the type of TLS packet, this is always the first byte in the packet. We are interested in identifying the packet as a handshake so we expect the first byte of the packet to be |16| (This is all defined in RFC5246 - The Transport Layer Security (TLS) Protocol Version 1.2). Shifting 4 bytes into the packet (distance:4; looking at the 6th byte in the packet) we expect the byte to be |01| which identifies the handshake type as ‘Client Hello (1)’. Finally, we match on the domain. The preceding 3 bytes identify additional pieces of information that help with matching correctly. The first |00| byte identifies the Server Name Type as the host name (host_name (0)). The second and third bytes, |00 0c|, are reserved to identify the length of the domain which immediately follows those bytes. In this case, the domain is 0x0c (12) bytes long.
If neither of the above are applicable, a DNS signature would be the last resort.
Dissection 2: DNS Lookups
The goal of a DNS lookup is to identify known malicious and/or suspicious domains that we do not want our systems communicating with or alternatively, they can be used to fill in timeline gaps on an infection chain timeline. For example, more and more malware is using external services to identify the public IP address used by an infected system. Creating a DNS lookup signature for these services will result in an alert prior to the main trojan signature alert. Crafting DNS signatures is a relatively easy task but there are a couple of rules you must follow depending on the content you are matching against.
Snort Example
alert udp $HOME_NET any -> any 53 (msg:"ET TROJAN Gootkit Domain (sslsecure256 .com in DNS Lookup)"; content:"|01|"; offset:2; depth:1; content:"|00 01 00 00 00 00 00 00|"; distance:1; within:8; content:"|0c|sslsecure256|03|com|00|"; fast_pattern; distance:0; nocase; classtype:trojan-activity; sid:90000000; rev:1;)
Shown above is a Snort DNS signature for a domain used in Gootkit campaigns. Instead of trying to rush out an explanation, we will break down the signature into each individual content match after highlighting some key points regarding the signature header information.
- The protocol for this signature is specified as ‘udp’. Suricata DNS signatures can also be written in the same way but also supports ‘dns’ as a protocol which gives us another way to write DNS signatures, this will be explained later.
- The destination IP variable is not set, this is because we are considering IDS/IPS placement. If you set this variable to $EXTERNAL_NET, you may miss DNS lookups that first contact your internal DNS server depending on IDS/IPS placement
- The destination port is set to 53, the standard port for DNS.
content:"|01|"; offset:2; depth:1;
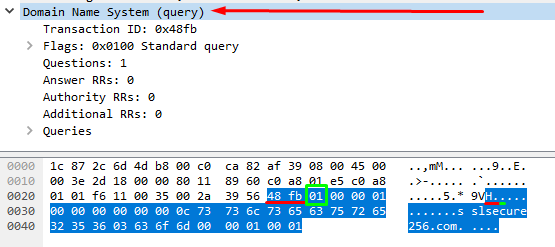
Here we are trying to match 0x01 at position 2 (third byte) which indicates that this is a standard query. Positional modifiers are attached after the content has been defined and in this case, we jump 2 bytes from the beginning of the packet data (offset:2;) to check whether the 3rd byte (depth:1;) matches 0x01 (content:”|01|”;). The depth modifier ensures that the signature only checks the following byte after our jump. If we were writing a signature where 0x01 can be in any of the 10 bytes that follow our jump, we’d write depth:10; however in this case, DNS packets follow the same structure making this a reliable method of identifying a DNS standard query.
content:"|00 01 00 00 00 00 00 00|"; distance:1; within:8;
Here, we are attempting to detect the flags within a DNS packet. There are 4 flags, each consisting of 2 bytes and they are Questions, Answer Resource Records (RRs), Authority RRs, and Additional RRs. Since we have identified this as a standard query, Answer RRs, Authority RRs, and Additional RRs are irrelevant and only apply to query response packets resulting in their bytes remaining static (|00 00 00 00 00 00|). ‘Questions’ is the number of records (or domains, if you like) we are querying. While this implies that we can query in multiples, such as an A record and an AAAA record in a single query, this is not the case, meaning our content match of |00 01| is very reliable.
Additionally, these flags appear 1 byte after our previous content match which we state in the rule with distance:1; (relative from the previous content match, jump forward 1 byte). We then tell our signature that the content match must occur within the next 8 bytes (within:8;).
content:"|0c|sslsecure256|03|com|00|"; fast_pattern; distance:0;
Time for the juicy and relatively simple part. We now want to state which domain we are looking for to make this signature fire. The first byte you see here (0x0c > |0c|) defines the length of the domain which in our case, is 12 bytes. We append this byte with the domain string. The next singled out byte, |03|, states the length of the second level/top-level domain which in our case has a length of 3 (com). A top-level domain of .info would be “|04|info”, .io would be |02|io etc. Finally, we specify the terminating null byte (|00|) that identifies the end of this ‘buffer’.
Since the juicy/unique part of our DNS signature is the domain that we are looking to detect, we will add our fast_pattern match here. Fast_pattern is used to improve the efficiency of a rule and should always be applied to your most unique piece of content. If you do not specify a fast_pattern in Suricata, the engine will specify a fast_pattern according to its Multi Pattern Matcher algorithm.
The ‘distance’ positional modifier was briefly explained previously but it is important to note that ‘distance:0;’ does not translate to “match immediately after the previous match”. Setting distance to zero means that the content match can appear anywhere within the rest of the packet, relative to the previous content match.
Suricata Example
In the section above, I mentioned that Suricata supports ‘dns’ as a protocol so we will be working from signatures that follow this format, as shown below in the first signature that we will be dissecting.
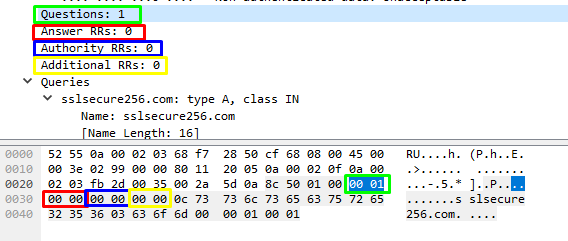
alert dns $HOME_NET any -> $EXTERNAL_NET any 53 (msg:"ET TROJAN Gootkit Domain (sslsecure256 .com in DNS Lookup)"; dns_query; content:"sslsecure256.com"; nocase; isdataat:!1,relative; classtype:trojan-activity; sid:90000000; rev:1;)
As before, we will break this down into each individual content match but as you may have already noticed, we only have 1 content match here.
dns_query; content:"sslsecure256.com"; nocase; isdataat:!1,relative;
The first piece of this snippet is ‘dns_query’ which is known as a sticky buffer. When using a sticky buffer, all content matches within that buffer must be specified after the keyword.
One of the first things you may have noticed here is that we are matching against the domain but we do not need to state the length of the domain or the second/top level domain. Due to the ‘dns_query’ keyword, the Suricata engine automatically inherits the knowledge of typical DNS packet structures meaning we no longer need to specify things such as flags or domain lengths.
Since we are working from a buffer known by the Suricata engine, we cannot add our terminating null byte (0x00) to the end of our match like we did in the snort rule. The ‘dns_query’ buffer ends before our null terminator so as a replacement, we will use ‘isdataat’ which allows us to move X bytes forwards and check whether data is present or not. Consider the following examples.
- isdataat:10,relative; - This translates to us jumping 10 bytes forward from the relative content match and then checking if any data exists.
- isdataat:!50,relative; - Here, we jump 50 bytes forward from the relative content match to check that no data exists (note the !).
- isdataat:20; - Jump 20 bytes into the payload and check to see if data exists.
Going back to our example signature, isdataat:!1,relative; means we are making sure that no data exists immediately after our content match and because dns_query ends before the null terminator, our ‘isdataat’ check returns true because we are looking for data outside of the buffer which (from the engine’s perspective) does not exist.

Dissection 3: HTTP Botnet Check-in (Suricata v4.0 only)
Signature 1
alert http $HOME_NET any -> $EXTERNAL_NET any (msg:"ET TROJAN Tinba Checkin 2"; flow:established,to_server; content:"POST"; http_method; content:"/"; http_uri; isdataat:!1,relative; content:"|0d 0a 0d 0a|"; content:!"|00 00 00 00|"; within:4; content:!"|FF FF FF FF|"; within:4; byte_extract:2,2,Tinba.Pivot,relative; byte_test:2,=,Tinba.Pivot,2,relative; byte_test:2,!=,Tinba.Pivot,5,relative; http_protocol; content:"HTTP/1.0"; http_content_len; byte_test:0,>,99,0,string,dec; http_header_names; content:"|0d 0a|Host|0d 0a|Content-Length|0d 0a 0d 0a|"; fast_pattern; content:!"User-Agent"; content:!"Accept"; flowbits:set,ET.Tinba.Checkin; reference:md5,7af6d8de2759b8cc534ffd72fdd8a654; classtype:trojan-activity; sid:2020418; rev:5; metadata:created_at 2015_02_12, updated_at 2015_02_12;)
Signature 2
alert http $EXTERNAL_NET any -> $HOME_NET any (msg:"ET TROJAN Tinba Server Response"; flow:established,to_client; flowbits:isset,ET.Tinba.Checkin; file_data; content:"|64 b4 dc a4|"; within:4; reference:md5,1e644fe146f62bd2fc585b8df6712ff6; classtype:trojan-activity; sid:2019169; rev:4; metadata:created_at 2014_09_12, updated_at 2014_09_12;)
Rule pairs like this may appear intimidating to begin with, so let’s dissect this signature in full (including rule header) to fully understand every aspect, starting with ‘Signature 1’.
http $HOME_NET any -> $EXTERNAL_NET any
Traffic must be HTTP and must be sourcing from a host within the $HOME_NET variable to a host in the $EXTERNAL_NET variable. Source and destination ports are irrelevant here and due to the protocol being set as ‘http’, Suricata is already aware that we are inspecting HTTP traffic which applies several rules and behaviors to the engine.
msg:"ET TROJAN Tinba Checkin 2"
Signature messages can technically be anything. This specific rule is part of the Emerging Threats project and is categorized as a trojan, hence ‘ET TROJAN’. The malware family is Tinba which is a banking trojan and the event/action that the rule is looking for is a command and control check-in. ET signatures follow the same format for trojan rules which is “ET(PRO)
flow:established,to_server;
Pretty simple one here, we are checking the 3-way handshake to the server in $EXTERNAL_NET.
content:"POST"; http_method;
To immediately begin narrowing down the traffic that our signature needs to look at, we specify that this traffic should be a POST request. As a side note here, if this was Snort and this HTTP traffic was on a non-standard HTTP port, we would not be able to use http_* keywords because Snort is not protocol aware. The Snort equivalent here is content:”POST”; depth:4;, unless this HTTP traffic is on a port specified in your $http_PORTS variable.
content:"/"; http_uri; isdataat:!1,relative;
Here, the http uri can only contain the “/” character due to the ‘isdataat’ check that follows (explained previously). Alternatively, this can be written as urilen:1; but that single character can be anything. It’s important to note that something like urilen:1; content:”/”; http_uri; isdataat:!1,relative; is redundant because we are performing multiple checks for the same thing.
content:"|0d 0a 0d 0a|"; content:!"|00 00 00 00|"; within:4; content:!"|FF FF FF FF|"; within:4;
There are 3 content matches here but it is important to explain them together. Since we are inspecting HTTP traffic, we have a lot more buffers to deal with compared to other protocols. This specific snippet is identifying the break between the HTTP headers and the data segment of the HTTP request. Suricata also has a buffer called http_client_body which is the buffer name for the data segment of a HTTP request. This signature does not use it and due to the age of the signature, I cannot tell you why this is the case. From experience, it is possible that a Suricata engine was failing to identify the http_client_body buffer. The alternate method to writing this snippet would be to drop the content of |0d 0a 0d 0a| (hex for return (0x0d) and newline (0x0a)), which you will always see between HTTP headers and HTTP data. We would then use http_client_body as follows – content:!”|00 00 00 00|”; http_client_body; within:4; content:!”|FF FF FF FF|”; http_client_body; within:4;
The other 2 content matches here are simply making sure that the first 4 bytes in the HTTP data segment do not match 0x00 or 0xFF. Content negations can be made by adding ‘!’ before we specify the data we are interested in negating, as demonstrated above.
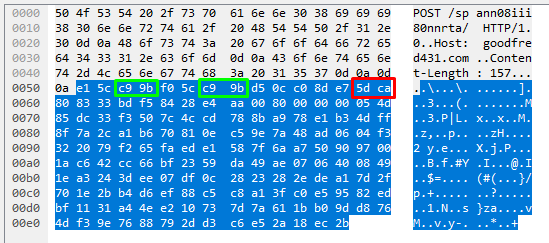
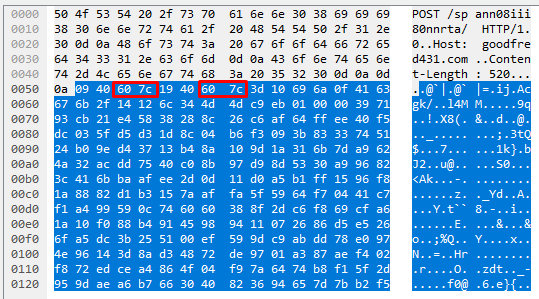
byte_extract:2,2,Tinba.Pivot,relative;
Before explaining this snippet, I will give the format for this keyword to hopefully make things clearer in the explanation
byte_extract:<bytes_to_extract>, <offset>, <name> [, relative]
        [, multiplier <multiplier value>][, <endian>][, string][, hex][, dec][, oct]
        [, align <align value>][, dce][, bitmask <bitmask>];
In our example, we have:
byte_extract:<bytes_to_extract>, <offset>, <name>, <relative>
Byte_extract is a keyword for identifying bytes at a certain position for us to then save as a variable and use later in some checks/comparisons. Our byte_extract is relative so we will be working from the bytes after |0d 0a 0d 0a| which was our last positive match. The signature is telling us to move forward 2 bytes, extract the 2 bytes in that position, and save them as ‘Tinba.Pivot’ for later use. Below is a screenshot of the traffic that this is relating to.
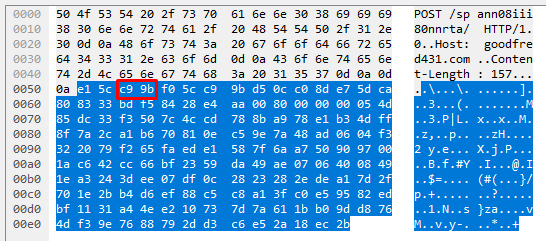
The bytes of interest in this case are |c9 9b| and these are the bytes we are extracting and saving. At this point, I assume someone is asking why we cannot just write content:”|c9 9b|”; offset:2; depth:2; into our rule and I will approach this shortly.
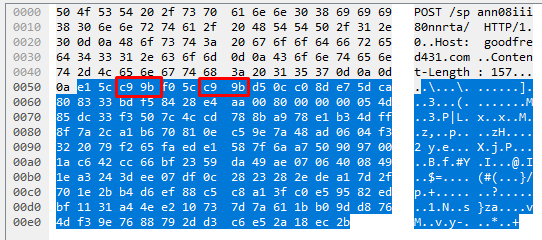
byte_test:2,=,Tinba.Pivot,2,relative;
Again, we have another byte_* keyword so again, here is the format for this keyword.
byte_test:<bytes to convert>, [!]<operator>, <value>, <offset>
        [, relative][, <endian>][, string, <number type>][, dce]
        [, bitmask <bitmask_value>];
Our byte_test keyword here includes the use of an operator. You can find the table of supported operators here but I’ll include it in this post for clarity.
- <
- >
- <=
- >=
- =
- &
- Bitwise XOR^
Now that we have our bytes extracted, we can test them! Our use of byte_test takes the following inputs:
byte_test:<bytes to convert>, <operator>, <value> (our variable name), <offset>, <relative>
We are now telling byte_test that we are dealing with 2 bytes (bytes to convert, multipurpose), we want to move 2 bytes forward (offset), it is relative to the last content match (in this context, it is our byte_extract), and we want to test if our 2 extracted bytes (saved as ‘Tinba.Pivot’) are equal (operator, =) to the bytes that we have just moved to. The screenshot below demonstrates where we took our bytes, where we moved to, and it shows that our bytes are equal.
Another perfect use case for byte_test is if you are detecting a specific protocol that has X flag at Y offset and it can only be certain values. For example, this example flag is at offset 5 and can only be 0x00, 0x01, 0x02, or 0x03. Anything other than those values are not accepted.
byte_test:0,<=,0x03,5;
Our byte_test above shows that we are looking at offset 5 and this value has to be equal to 0x03 or lower (0x00, 0x01, 0x02) meaning that all of the possible flags have been accounted for. This is a great way to ensure that you remain accurate in detecting the specific protocol and prevents false positives.
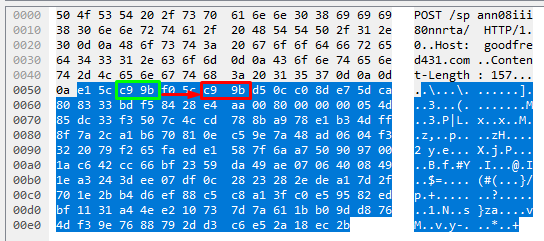
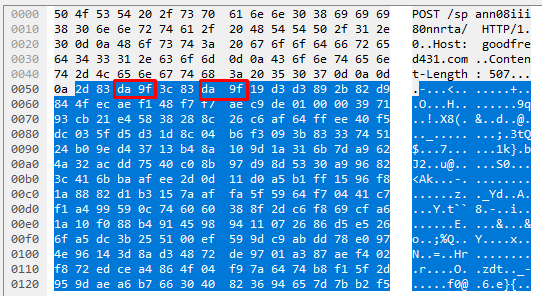
byte_test:2,!=,Tinba.Pivot,5,relative;
A second byte_test. The difference here is that we are now moving relative to the byte_test that we have just completed and instead of moving forward by 2 bytes, we are moving forward by 5 bytes (offset is set to 5 here), and we are looking to make sure that our extracted bytes are NOT equal to the bytes in these positions, as shown in the below screenshot.
Now, earlier on I mentioned that someone may be asking why we cannot write a static content match for |c9 9b| here. The reason being is that these bytes change on each request. The screenshots below show the HTTP data segment from 4 different HTTP requests yet still from the same sample.
This is a prime example of how to use byte_* operations to get around traffic like this where most of the data appears to be encoded/encrypted.
http_protocol; content:"HTTP/1.0";
Another useful http keyword is http_protocol which allows us to state what version of HTTP we expect to see in the traffic. This is another sticky buffer, which is why we state our content afterwards instead of before. It is important to remember which keywords are sticky buffers or else your signature will error. You can read about Suricata http keywords here.
http_content_len; byte_test:0,>,99,0,string,dec;
Another http keyword, another sticky buffer. We also have another byte_test here. Since Content-Length is a variable length and the packets analyzed did not remain a static size, but they were all greater than X in size, it makes sense to byte_test this value. Our inputs for this byte_test are as follows:
byte_test:<bytes to convert>, <operator>, <value>, <offset>, <string>, <number type>
Earlier, I mentioned that byte_test has multiple purposes and this example somewhat demonstrates this. Byte_test can be used to look at certain bytes, convert them to a different format (such as converting hex into decimal), and then use an operator to test with the newly converted formats. In our example here, we are checking that Content-Length is greater than 99, let’s break it down a little more.
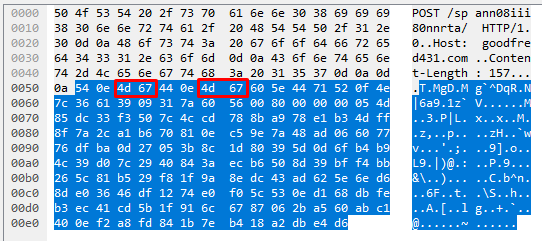
Our ‘bytes to convert’ is 0 here because we do not need to pull a value from anywhere in the packet, we already know the value we want to be testing with, which is ‘99’ and is stated in our ‘value’ input. Our offset is set to 0 because this byte_test is working relative to our http_content_len sticky buffer. The screenshot below identifies where this sticky buffer is applied and explains why our offset is set to 0.
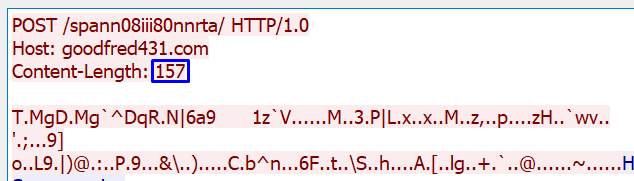
Our ‘string’ input tells the byte_test to store data as a string and the input that follows, ‘dec’, tells the byte_test to convert our string to decimal so that we can compare it to our value, which is a decimal. Finally, the byte_test will check to see if the data in this buffer, converted to decimal, is greater than 99. As you can see in the screenshot, one of our sample packets showed a Content-Length of 157 meaning the byte_test returns true.
http_header_names; content:"|0d 0a|Host|0d 0a|Content-Length|0d 0a 0d 0a|"; fast_pattern; content:!"User-Agent"; content:!"Accept";
Sticky buffers for everybody! In this instance, we are using http_header_names to check whether certain HTTP headers and to negate some headers that are typically common in HTTP traffic. Negating HTTP headers is a great way to cut false positive potential right off the bat. In this snippet, we are checking that the Host and Content-Length headers are present. The screenshot from our byte_test explanation shows that we do indeed have a Host and Content-Length header but, no others. There is no User-Agent header or Accept header which is always suspicious, so we negate those header which tells our signature not to fire if User-Agent or Accept is present.
flowbits:set,ET.Tinba.Checkin;
And finally, we have flowbits. There are several use cases for flowbits, whether you are using them to reduce the potential for false positives or a single signature is not enough to detect the traffic you are analyzing. Flowbits take 2 inputs unless you are specifiying ‘noalert’ which will prevent the signature from firing, regardless of whether it matches or not. Using noalert is rather common and is useful to reduce noise on SIEMs, especially if your use case for flowbits is to reduce flowbits (if your single signature was causing too many FPs, why continue to allow it to alert?).
In this example, we are setting the flowbits with ‘set’ and naming it ‘ET.Tinba.Checkin’ (this name can be anything). Other options include isset, toggle, unset, and isnotset. Now that flowbits are set, a second signature will be created and tied together with this first signature by using ‘isset’ and the name defined in signature 1. This signature pair is using an HTTP POST request from the infected host to the C2 server in the first signature and the second signature will be detecting on a packet from the C2 server back to the infected host. Remember that for flowbits to work, the packets you are matching on must all be within the same stream.
This brings us onto signature 2 in this pair.
alert http $EXTERNAL_NET any -> $HOME_NET any (msg:"ET TROJAN Tinba Server Response"; flow:established,to_client; flowbits:isset,ET.Tinba.Checkin; file_data; content:"|64 b4 dc a4|"; within:4; reference:md5,1e644fe146f62bd2fc585b8df6712ff6; classtype:trojan-activity; sid:2019169; rev:4; metadata:created_at 2014_09_12, updated_at 2014_09_12;)
Immediately, we can see that this is watching for a packet from the server ($EXTERNAL_NET) to the infected host ($HOME_NET) and we notice that flowbits are defined as ‘isset,ET.Tinba.Checkin’ which states that the conditions in our previous signature must have been met before this signature becomes active.
file_data; content:"|64 b4 dc a4|"; within:4;
file_data is another sticky buffer and is the equivalent of http_client_body except this is used on traffic in the opposite direction. For client -> server, http_client_body is used and for server -> client, file_data is used. In this case, the first 4 bytes in the server response must contain |64 b4 dc a4|.
If you have stuck around for long enough to read up until this point, thank you for reading, this post admittedly ending up being much longer than I intended. I’ll close out with… if you want to give writing your own signatures a go, I’d be happy to review them and provide feedback to you.
For some useful Suricata tools, tips, and tricks, head over to the Emerging Threats Github.
Happy new year!
(post recovered from 2018)